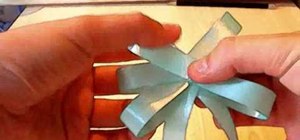
First of all you have to place your thumb or attach a pin on the ribbon such that there is a space of two to three inches left outside. Bend the ribbon back to the center to create your first loop. Now you have to pass the ribbon back underneath the bow. Then you have to again return to the center to create a complete second loop. Now continue passing the ribbon over and under the bow. Now return to the center and then repeat this step to create six loops in total. After this you have to turn the bow so that the tail pieces are facing downwards. Make any adjustments that are required and then pin it at the center to secure it. Now you have to trim the ribbon tails to the same length. Sew a running stitch up in center of the bow and back down again. Finally pull the thread to bunch up the ribbon in the center, wrap the threads around the center a few times. Now you have to sew it to secure it. In case you want more detailing then you can sew piece of co-coordinating ribbon around the center. You can attach a clip or barrette on to the back to wear in your hair. That's it.
Just updated your iPhone? You'll find new emoji, enhanced security, podcast transcripts, Apple Cash virtual numbers, and other useful features. There are even new additions hidden within Safari. Find out what's new and changed on your iPhone with the iOS 17.4 update.

















Be the First to Comment
Share Your Thoughts